How to Import Bank Statement in Tally Prime
Import Bank Statement
The bank statement can be imported for bank reconciliation. Depending on the bank that is selected, the supported formats will appear, for example, Excel, MT940 and .CSV.
- Gateway of Tally > Banking > Bank Reconciliation > and press Enter.
- Alternatively, Alt+G (Go To) > type or select Bank Reconciliation > and press Enter.
- Select the required bank.
- Press Alt+O (Import) > and select Bank Statement.
The Select File screen appears, as shown: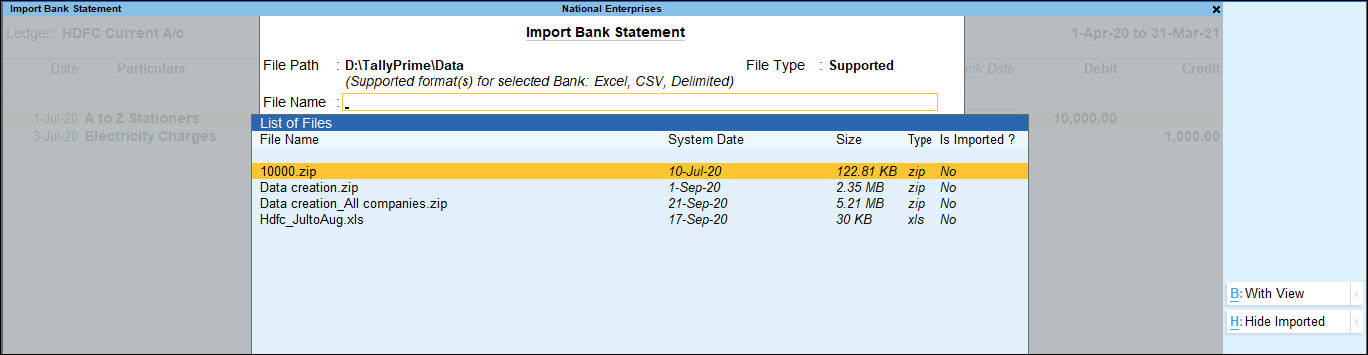
The Select File screen displays the Directory which is specified as the Location of new bank statement files in F12 (Configuration) > Banking Configuration. - Select the required file format in File Type field. Based on the format selected the bank statements are displayed under List of Files.
- Select the file to be viewed.
- Press Alt+B (With View). The Bank Statement appears as shown below:

- Press Esc if you do not intend to import the bank statement.
- Press Alt+H (Import) to import the bank statement.
The import progress bar is displayed followed by the Success message with count of Total Entries in Bank Statement, Reconciled transactions and Additional Bank Entries. The Bank Statement appears as shown below: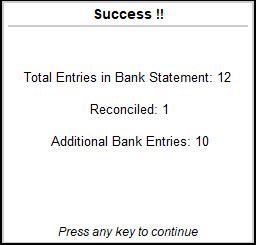
Note: Ensure that the bank statements which is being imported is not edited or altered. If any changes are made, the error message Not a valid format will be displayed while importing the statement.
- Press any key.
After importing the bank statement, the bank dates are filled in the Bank Date column automatically in the Bank Reconciliation screen. - Press F12 (Configure) from the Bank Reconciliation screen. Set Show Difference in Bank Balance to Yes.
- Accept the Configuration screen.
The Bank Reconciliation screen with imported bank statement details appears as shown below:
There may be transactions which have been executed at the bank’s end (for example, bank charges, interest credit, and so on) but not yet reflected in the books of accounts. The details of such transactions will appear under the Amount Not Reflected in Company Books in Bank Reconciliation screen. You can reconcile them with existing transactions or create new vouchers.
Note: To avoid errors, save the Bank Reconciliation before reconciling the unlinked transactions.
The reconciliation details at the bottom of the screen displays:
- Balance as per Company Books: The balance as per company books, as on the last date is displayed.
- Amounts not reflected in bank: The debit and credit sums of all those vouchers, whose bank date is either blank or later than the defined period is displayed. (I.e. these vouchers are not reflected in the bank statement).
- Amount not reflected in Company Books: The total value of the entries which are present in the bank statement but are not recorded in company’s books is displayed.
- Balance as per Bank: The net value of the book balance offset by the amounts not reflected in the bank is displayed. This should be equal to the balance in the bank statement unless there are some discrepancies.
- Balance as per imported Bank statement: The Balance as per Imported Bank Statement refers to the balance displayed on importing the bank statement for reconciliation.
- Difference: The Difference in Bank Balance (difference in Balance as per Bank and Balance as per Imported Bank Statement) will be shown here.
Note: Some discrepancies may persist due to entries made in the bank statement, which may not have been entered in the books of accounts.
Reconcile the unlinked transactions one-by-one, with existing transactions
- In the Bank Reconciliation screen, select the transaction to be reconciled displayed under Amount Not Reflected in Company Books.
- Press Alt+Q (Reconcile Unlinked).
The transaction(s) from the company books matching the unlinked transaction amount are displayed for selection in the Unreconciled Transactions screen. - Select the appropriate transaction using spacebar.
- Press Enter.
- The status Reconciled Successfully is displayed.
Reconcile all unlinked transaction in one-go
You can reconcile transactions from the imported bank statement and the company’s book from a single screen in one-go. The transactions need not be matched manually.
- Press Alt+R (Reconcile All Unlinked). The Unreconciled Transactions screen appears as shown below:
The Unreconciled Transactions screen displays the matching transactions. The amount not reconciled in the bank statement is displayed under Transaction from Bank Statements to be Reconciled. - Press Enter to link the selected transaction and to reconcile.
- The status Reconciled Successfully is displayed.
- Press [Esc] to skip the current transaction and proceed to the next for reconciliation.
- Press S: Stop to stop the reconciliation process.
If there are no matching transactions, the values pending for reconciliation is displayed under Transaction from Bank Statements to be Reconciled section.
In case, there are no transaction to link, a message No unreconciled transaction exists with same amount is displayed as in the image shown under step 1.
Reconcile the unlinked transactions by creating new vouchers
- In the Bank Reconciliation screen, select the transaction to be reconciled displayed under Amount Not Reflected in Company Books.
- Press Alt+J (Create Voucher). The Voucher Creation screen appears.
- Enter and accept the transaction according to the transaction displayed in the Amount Not Reflected in Company Books section.
The details displayed under the Amount Not Reflected in Company Books section is removed indicating that the corresponding entry is found in the books of accounts.Note: Payment/receipt/journal voucher can be created to account for the entries that are not reflected in company books.
Re-import the Bank Statement
While selecting the bank statement for importing, all the statement including the ones which is already imported is displayed. To hide the already imported statement:
- Press Alt+I (Import) > Bank Statement from the Bank Reconciliation screen. The Select File screen appears as shown.
- Press Alt+H (Hide Imported) to display only the statement which is not yet imported.
The Alt+H is a toggle button which can also be used to Show Imported statements.
If an attempt is made to re-import the bank statement, a message Bank Statement already imported. Continue? is displayed as shown below:
How to Import Bank Statement in Tally ERP9
View, Import or Re-import Bank Statement and Reconcile Transactions
You can import the bank statement for all the transactions you have made and reconcile them with your book of accounts.
On this page
View Bank Reconciliation Report
Reconcile the unlinked transactions one-by-one, with existing transactions
Reconcile all unlinked transaction in one-go
Reconcile the unlinked transactions with new vouchers
View Bank Reconciliation Report
The Auto Bank Reconciliation option helps to view bank statements, import bank statements, and reconcile transactions.
1. Go to Gateway of Tally > Banking > Bank Reconciliation
2. Select the bank. The Bank Reconciliation screen appears.
Note:
♦ Valid TSS and internet connectivity are required for performing auto reconciliation.
♦ The facility to import and view bank statements will be available only for banks enabled with auto reconciliation feature in bank ledger.
The following buttons will be enabled only for the bank ledgers enabled with auto reconciliation option.
● B : Bank Statement and R : Reconcile Unlinked appear on the right side button bar
● D : Delete Unlinked button appears on the button bar above Info Panel .
Import Bank Statement
The bank statement can be imported for bank reconciliation. Depending on the bank that is selected, the supported formats will appear, for example, Excel, MT940 and .CSV.
1. Go to Gateway of Tally > Bank Reconciliation .
2. Select the required bank.
3. Click B : Bank Statement from the Bank Reconciliation screen. The Select File screen appears as shown.
The Select File screen displays the Directory which is specified as the Location of new bank statement files in F12: Configuration > Banking Configuration .
4. Select the required file format in File Type field. Based on the format selected the bank statements are displayed under List of Files .
5. Select the file to be viewed.
6. Click I: With View . The Bank Statement appears as shown below:
7. Press Esc if you do not intend to import the bank statement.
8. Click I : Import to import the bank statement.
Note: The bank statement which is already imported can be selected again for import, if the option Show Imported Bank Statement is set to Yes under F12: Configure . The files will be listed in alphabetical order with details of file type and import status.
9. The import progress bar is displayed followed by the Success message with count of Total Entries in Bank Statement , Reconciled transactions and Additional Bank Entries . The Bank Statement appears as shown below:
Note: Ensure that the bank statements which is being imported is not edited or altered. If any changes are made, the error message Not a valid format will be displayed while importing the statement.
10. Press any key.
11. After importing the bank statement, the bank dates are filled in the Bank Date column automatically in the Bank Reconciliation screen.
12. Click F12: Configure from the Bank Reconciliation screen. Set Show Difference in Bank Balance and Show all Unreconciled Transactions Till Date to Yes .
13. Accept the Configuration screen.
The Bank Reconciliation screen with imported bank statement details appears as shown below:
There may be transactions which have been executed at the bank’s end (for example, bank charges, interest credit, and so on) but not yet reflected in the books of accounts. The details of such transactions will appear under the Amount Not Reflected in Company Books in Bank Reconciliation screen. You can reconcile them with existing transactions or create new vouchers .
Note: To avoid errors, save the Bank Reconciliation before reconciling the unlinked transactions.
The reconciliation details at the bottom of the screen displays:
o Balance as per Company Books : The balance as per company books, as on the last date is displayed.
o Amounts not reflected in Bank : The debit and credit sums of all those vouchers, whose bank date is either blank or later than the defined period is displayed. (I.e. these vouchers are not reflected in the bank statement).
o Amount not reflected in Company Books : The total value of the entries which are present in the bank statement but are not recorded in company's books is displayed.
o Balance as per Bank : The net value of the book balance offset by the amounts not reflected in the bank is displayed. This should be equal to the balance in the bank statement unless there are some discrepancies.
Note: Some discrepancies may persist due to entries made in the bank statement, which may not have been entered in the books of accounts.
Reconcile the unlinked transactions one-by-one, with existing transactions
1. In the Bank Reconciliation screen, select the transaction to be reconciled displayed under Amount Not Reflected in Company Books .
2. Click R : Reconcile Unlinked .
3. The transaction(s) from the company books matching the unlinked transaction amount are displayed for selection in the Unreconciled Transactions screen.
4. Select the appropriate transaction using spacebar.
5. Press Enter .
6. The status Reconciled Successfully is displayed.
Reconcile all unlinked transaction in one-go
You can econcile transactions from the imported bank statement and the company's book from a single screen in one-go. The transactions need not be matched manually.
1. Click R : Reconcile All Unlinked . The Unreconciled Transactions screen appears as shown below:
The Unreconciled Transactions screen displays the matching transactions. The amount not reconciled in the bank statement is displayed under Transaction from Bank Statements to be Reconciled .
2. Press Enter to link the selected transaction and to reconcile.
3. The status Reconciled Successfully is displayed.
o Press [Esc] to skip the current transaction and proceed to the next for reconciliation.
o Press S : Stop to stop the reconciliation process.
If there are no matching transactions, the values pending for reconciliation is displayed under Transaction from Bank Statements to be Reconciled section.
In case, there are no transaction to link, a message No unreconciled transaction exists with same amount is displayed as shown below:
Reconcile the unlinked transactions by creating new vouchers
1. In the Bank Reconciliation screen, select the transaction to be reconciled displayed under Amount Not Reflected in Company Books .
2. Click C : Create Voucher . The Voucher Creation screen appears.
3. Enter and accept the transaction according to the transaction displayed in the Amount Not Reflected in Company Books section.
The details displayed under the Amount Not Reflected in Company Books section is removed indicating that the corresponding entry is found in the books of accounts.
Note: Payment/receipt/journal voucher can be created to account for the entries that are not reflected in company books.
Re-import the Bank Statement
While selecting the bank statement for importing, all the statement including the ones which is already imported is displayed. To hide the already imported statement:
1. Click B : Bank Statement from the Bank Reconciliation screen. The Select File screen appears as shown.
2. Click S : Hide Imported to display only the statement which is not yet imported.
3. The S : Hide Imported is a toggle button which can also be used to S : Show Imported statements.
If an attempt is made to re-import the bank statement, a message Bank Statement already imported. Continue? is displayed as shown below:
Source:
https://help.tallysolutions.com/tally-prime/banking-utilities/bank-reconciliation-tally/
https://help.tallysolutions.com/article/Tally.ERP9/Banking/import_bank_stmt_in_bank_recon.htm
Disclaimer: The information contained in this blog is for general information & Educational purposes only. Any reliance you place on such information is therefore strictly at your own risk.
Comments
Post a Comment